Monday, February 28, 2011

Block-a-palooza | Block #11


Welcome Blockapaloozas! We are over half way now and entering the home stretch! Not to worry though if you are not on schedule or if you haven't even started. Take your time and enjoy it!

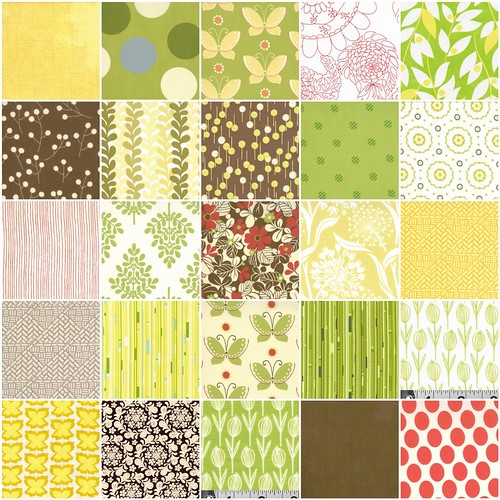
I am very excited to be representing the Fat Quarterly team for this quiltalong! Moda's Sunkissed is such a great fabric line and I just love flying geese so I leapt at the chance of designing a block using the 2.


If you are using Sunkissed you will need:

5 1/2" x 13 1/2" of the grey solid (Sunkissed Misty Grey 5448 15)
4 1/2“ x 10“ of the grey check print (Sunkissed Misty Grey 5447 15)
5 172“ x 13 1/2" of the swirly grey print (Sunkissed Misty Grey 5441 15)
6“ x 12“ of the grey flowers print (Sunkissed Misty Grey 5444 25)
10 1/2” x 12” of the pink text print (Sunkissed Pink Sorbet 5440 14)

Cutting Instructions:

From the grey solid, cut:
2 squares 3“
8 squares 2 1/2“

From the grey check print, cut:
4 rectangles 2 1/2“ x 4 1/2“

From the grey swirly print, cut:
8 squares 2 1/2“
2 squares 3“

From the pink text print, cut:
4 rectangles 2 1/2“ x 4 1/2“
8 squares 3“

From the grey flowers print, cut:
8 squares 3“

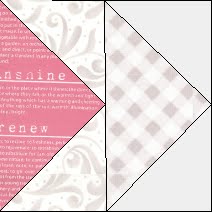
How to Make Half Square Triangles


Place 2 squares right sides together and draw a line down the diagonal on the wrong side. Sew 1/4” away from the line on both sides of the line.


Cut along the diagonal line, open and press. Trim to 2 1/2”.

Make the HSTs for your Block

1. Make 12 half square triangles from the grey flower and pink text print by pairing 6 of the 3“ pink text squares with 6 of the grey flower 3“ squares.

2. Make 4 half square triangles from the pink text print and the grey swirly print by pairing the 2 remaining 3” pink text print squares with the 2 grey swirly 3” squares.

3. Make 4 half square triangles from the grey solid and the grey flowers by pairing the 2 remaining 3” grey flower squares with the 2 grey solid 3” squares.

How to make Flying Geese


Draw a line down the diagonals on the wrong side of each of 2 1/2” squares.
Line up 1 square with the edge of the 2 1/2” x 4 1/2” rectangle with right sides facing. Make sure the diagonal line runs from the top middle of the rectangle to the bottom outside corner. Sew along the diagonal. Trim away excess to leave a 1/4” seam allowance. Open and press.


Line up the second 2 1/2” square with the other side of the rectangle with the diagonal line running from the top middle of the rectangle to the bottom outside edge. Sew along the diagonal, trim away excess to leave a 1/4” seam allowance and open and press.

Make the Flying Geese for the Block

1. Make 4 flying geese using the 4 pink text print 2 1/2” x 4 1/2” rectangles and the 8 grey swirly print 2 1/2” squares.

2. Make 4 flying geese using the 4 grey check 2 1/2” x 4 1/2” rectangles and the 8 grey solid 2 1/2” squares.

Putting it All Together


1. Arrange the grey swirly print and pink text print half square triangles in a pinwheel shape and sew together.


2. Sew each of the grey check print flying geese to the top of a pink text print flying geese to make 4 flying geese units.


3. Arrange 3 grey flower print/pink text print half square triangles and 1 grey flower print/grey solid half square triangle into a 4 patch as shown. Sew together and repeat so you have 4 such units.


4. Arrange these units into rows as shown and sew together.


5. Sew the rows together as shown.

Now you have block #11! Hooray! I can't wait to see everybody's blocks in the Flickr group.

You can download the pdf version of this block here.

Next up is Block #12 by Jennifer Davis which can be found on her blog Sugar Stitches. See you all there!

take care

Tacha

Sunday, February 27, 2011

March Modern Fabric Madness!

Love fabric? Love competition? Well, in the spirit of March Madness, we're excited to announce MODERN MADNESS -- a fun new interactive activity for all of our readers for the month of March.

See? This is what happens when you put a guy in charge of a quilting activity! : )
Oh, and Go Heels!

Our version of the Big Dance will pit all of your favorite modern fabric lines against one another in a fierce competition to determine the winner -- the #1 current (or recent) fabric line as determined by the readers of Fat Quarterly.

Here's how it will work:
  • We've already randomly created the brackets containing the top 64 fabric lines in the quilting world (in our humble opinion. Sorry in advance for any unintentional omissions, though we think it's pretty comprehensive.) Print the brackets out to play along!
  • Throughout the month of March, we'll be posting the different rounds and regions of competition. Once posted, a survey will go live for you to vote for your favorites.
  • Once the voting for each round is closed, we'll update the brackets and get ready for the next round of competition.
From 64 contenders, only one will emerge as the winner. Lots of great debate, conversation, and celebration will ensue.

Here's the schedule:

Round 1
  • Region 1: March 2nd
  • Region 2: March 6th
  • Region 3: March 9th
  • Region 4: March 11th
Round 2
  • Region 1: March 14th
  • Region 2: March 18th
  • Region 3: March 20th
  • Region 4: March 24th
Regionals
  • Part 1: March 27th
  • Part 2: March 29th
Quarterfinals - April 1st

Semifinals - April 3rd

Championship - April 7th

And college basketball fans know the best part about March Madness: predicting all of the winners before the competition starts, and keeping track of how many points you earn by being correct!

We encourage you to print the brackets before we begin on March 2nd and fill it out. We'll give tips on how to keep score throughout the competition, and we may even create a leader board to see how you're stacking up against other readers.

Sound like fun? Ready to play? Download your brackets here.

Saturday, February 26, 2011

Featured Crafter - Simply Robin

To tie in with the release of our 'Solids' Issue of Fat Quarterly, we chatted to fiber artist and photographer Robin Ferrier of Simply Robin. Robin uses solids in her quilts in a way that will stop you in your tracks and say 'Wow!'

Welcome Robin :)


FQ: Tell us a little about yourself and your artistic background?

RF: My name is Robin Ferrier; I live on Maui with my husband, three children and an assortment of animals. I come from a family that sews; my mother was a seamstress, my grandmother made quilts, and my aunts each sew as well. I learned to use a sewing machine when I was young, but it was not until college that I made my first quilt. I was longing to be connected to the women of my family and I wrote my aunt and asked her how to make a quilt. She said cut up a bunch of squares out of various fabrics, cut those into triangles and then rearrange the triangles into a pleasing pattern. After that quilt I was hooked! My artistic background consists of majoring in fine arts in college until the realities of living the life of an artist were revealed to me. I course-corrected and became a nurse, which was a good decision at the time. Now, I cannot help but feel blessed to be able to pursue my artistic passions without the stress of having to earn a living with it.


FQ:How would you describe your work?

RF:Currently, my work consists of two different styles. In my “elements” series, I use my own hand-dyed fabrics to create original non-representational patterned compositions. These quilts are often saturated with color, which I suspect is a result from living in Hawaii where the sun is bright all year long and intense colors are a part of my everyday. I am working to tone things down and am introducing more neutrals into my work. My other style involves working with brightly colored commercial fabrics and large fields of white. I’m making a series of couture baby quilts that depict simple scenes and playful imagery. It’s a light-hearted diversion from my usual work. In both series I throw away the ruler and prefer instead the beauty of a hand-cut line.


FQ: Where does your passion to create come from?

RF: I’ve always known I have a propensity to create. It’s something I consider part of my personality. My father was a DIY kind of guy and my mother made things when we had very little. It was that early exposure to making things by hand that made me want to do things like that for myself. I’d like to think I take it a step further by having an intense desire to bring something new to the world of quilts. I don’t think I’ve actually done that yet, but I’m working on it!

FQ: Can you describe your design process with an example, from the seed of an idea to a completed project?

RF: Typically I start with an image in mind or an idea I’d like to expand upon further. With my elements series, I’ve generally moved from simple shapes to those that are more complex. I often make a bunch of fabric first by either sewing pieces together into assorted blocks, or larger pieces together to make panels, which can be cut into. At this stage I focus primarily on making the fabric. The composition of the quilt usually reveals itself to me when I have a pile of fabric to work with and feel ready to move on. With the baby quilts, I usually have a scene in mind and go from there. I’ll make a bunch of houses or stars and assemble them after I have a pile to work with. I strive to introduce something new with each quilt and am constantly pushing myself to up my game.

FQ: You work with solids a lot. Is this a favourite subject matter for you? How do you select solid colour combinations? Can you share a word or two on dyeing fabric?

RF: Yes! I love working with solids! I started working with them after I became frustrated with commercial fabrics. At that time, because I knew so many of the prints, I found myself focusing more on the fabric rather than the overall design. Commercial prints often date a quilt and I wanted my work to be more timeless than that. Also, because of my sensitivity to color, I found that many of the commercial prints seem to have a narrow range of value. It was hard for me to find fabrics that were either extremely light or extremely dark, so I began dyeing my own fabric and have pretty much solved those problems. As for how I select my colors, sometimes I start with a limited palate, sometimes I don’t. I tend to prefer quilts in which the colors all relate to each other in one way or another; sometimes are in the same color family, sometimes they are in a gradation from one color to the next, and sometimes they are a gradation across the color wheel. Having a large variety of colors to choose from helps, and dyeing my own fabric affords me that freedom.

FQ: Do you have a favourite piece that you have made that holds a special spot in your heart?

RF: Of course they are all special, but I’d have to admit my “Shibori Sun’s” quilt is still one of my favorites. At first glance, it’s a simple quilt made entirely of circles, but when you look closer you can see that those circles were dyed and over-dyed using the shibori clamp technique in which I sandwiched fabric between two mason jar tops and secured it all together with string. The metal lids that I used were not perfectly flat, so what resulted were inconsistencies in the shapes of the circle, and the string created lines projecting from the circles, much like rays from the sun. It was the first quilt I made entirely from my own hand-dyed fabric, the first one in which I incorporated different sized blocks into one quilt, and the first quilt of mine that was accepted into a local juried art show. After making and exhibiting it I really started to look at myself as an artist.

FQ: Your blog is so full of inspiration and we love how you describe your processes and share insights, tutorials, introduce us to artists who inspire you and so much more. What is the best part about blogging for you?

RF: I’ve been blogging for almost six years now… hard to believe… and over the years my blog has morphed from a running commentary on my family life, to that of a more focused art blog. I almost quit for good several years ago, but then realized it benefits me immensely. The blog keeps me focused. I have a personal goal of blogging each weekday; so everyday I know at least some of my time is spent thinking about art. The blog keeps me connected. I have made many friends through blogging and feel like I have a host of like-minded companions sharing this journey with me. The blog keeps me current. I try to not repeat myself and am constantly working to create fresh new work. Finally, the blog is a way to give back. I do know I’ve inspired people with my blog, and sometimes someone will take the time to tell me how I’ve touched them in a special way. I’ve had many kind and gentle people guide and inspire me over my years of making quilts and I feel blessed to be able to do this for other people.

I’d also like to add here that I’ve set my blog up with Wordpress and a special template that showcases my photography. I have a fondness for taking pictures and have invested in good equipment. Being a photographer helps me to develop my eye and it also offers a satisfying diversion from the non-representational work I do with fabric.

FQ: What’s next in the creative world of Simply Robin?

RF: I’m currently working on a “slow cloth” in which I’m trying an assortment of surface design techniques as well as stitching. I’ve never quilted a whole quilt by hand, so this may just be my first. I also have a couple of couture baby quilts swimming around in my head and of course more ideas for simply solid quilts. This summer I want to play with over-dyeing as a means to create interesting cloth. Of course I have too little time to do all of this but perhaps that isn’t a bad thing after all!

Thanks so much for taking the time to chat with us today Robin.

You can catch up with Robin on her blog or visit her flickr photostream - truly inspiring.


Thursday, February 24, 2011

Be Our Guest: Freshly Pieced

Were you inspired by our Amazing Orange mosaic earlier this week? Well, today we are lucky enough to have Lee from Freshly Pieced join us as a guest blogger, and she's bringing a fun & bright project idea for you all (featuring orange, of course).

Have you visited Lee's site yet? She is an amazing quilter, a mother of two, and a graphic designer from Milwaukee, Wisconsin. She blogs at http://freshlypieced.blogspot.com

Please join us in welcoming Lee to the Fat Quarterly blog today.

--

Hi there, I'm Lee from Freshly Pieced. I'm so excited to be guest blogging for Fat Quarterly today. I've got a fun project for all of you who are trying to beat the winter blahs (I know I am). So how about a pillow with a cheerful, wonky sun? It whips up quickly and easily with a wedge ruler—no paper-piecing or curved piecing required!

Sunshine Pillow: Trying to beat the winter blahs? How about a pillow with a cheerful, wonky little sun? It whips up quickly and easily with a wedge ruler—no paper-piecing required!


You will need:
- a 30-degree wedge ruler, such as the Fat Cats ruler by Darlene Zimmerman
- bright-colored scraps for sun rays and center
- approx. 1/2 yard of light blue solid for background
- approx. 1/8 yard of orange print for border
- 1/2 yard for pillow back
- 18" pillow form


1. From your bright scraps, cut 12 strips, about 2" x 6". No need to be exact—wonkiness is good here! These will be the rays of your sun, so cut them a little wider on top, narrower on the bottom. From your solid blue background fabric, cut 14 strips, 3" x 6".

2. Sew the strips together into one long piece, alternating between the light blue solid and the bright scrappy strips. Start and end with a light blue strip. Be sure to alternate the direction of the rays as you sew, so the narrow end is on top, then on the bottom, then on the top, and so on (see photo above). But don't worry about the order of your rays, or whether the finished piece is straight—none of that will matter in the next step!

3. Using your wedge ruler, cut 12 wedges from your pieced strips. To cut your first wedge, center the ruler over one of the rays, with the narrow end of the ruler over the narrow end of the ray, as shown. Again, no need to be exact. To cut the next strip, turn the ruler 180 degrees and center it over the next scrappy ray. When all of your wedges are cut, trim six of the wedges to 4.5" long, and the other six wedges to 5" long.

4. From your light blue solid, cut a strip 5" by about 36". From that strip, cut 6 more wedge pieces. These wedges will start at the 4" mark on the ruler and extend to the 9" mark (see photo).

5. Sew these wedge pieces onto the 4.5" ray pieces, end to end, to create a complete wedge that is 9" long.

6. Cut another strip from your light blue solid, this time 4.5" by about 36". From that strip, cut another 6 wedge pieces, just as you did in step 4— except that this time, the wedges will start at the 4.5" mark on the ruler, extending to the 9" mark. Sew these wedge pieces onto the 5" ray pieces, end to end, just as you did in step 5. You will now have a total of 12 wedges that are 9" long.

5. Sew your wedges together into a circle measuring a little more than 20" across. I sewed the wedges together in groups of three, creating quarter-circles, then sewed the quarters together. Press your seams out.

6. Trim your pieced circle to a 14.5" square. To do this, fold the circle in half and press, then fold in half again and press. Use these press marks as center points as you square up. You will cut off quite a bit of excess at the sides, but very little at the corners of the square.

7. Cut a 4" circle from your remaining scraps, and applique it on for the sun's center. There are many ways you could applique your center—I used the method described in this tutorial (http://sewmamasew.com/blog2/?p=6713) by Elizabeth Hartman on Sew Mama Sew.

8. Cut four 2.5" strips at least 18" long from your orange border print. Sew a strip onto each side of your sun block.

9. You now have a completed pillow top. I hand-quilted mine using white Perle cotton. I used this tutorial from Cluck Cluck Sew (http://www.cluckclucksew.com/2009/10/tutorial-scrap-buster-fall-pillow.html) to make a simple envelope closure for the back of the pillow.

That's it—enjoy it until the real sun comes out again!

Tuesday, February 22, 2011

Amazing Orange

This was my first time curating the themed inspiration mosaic, and let me tell you -- it was tough! The Fat Quarterly Community & Inspiration Flickr group is chock full of wonderful photos. You should swing by for a visit if you haven't already, bookmark it, and add your favorite photos for the current theme!


Want to get involved? Our next theme is "Vibrant Violet". Have you made or seen anything that's pretty in purple? Add it to the group, and it may end up in our March mosaic!

Sunday, February 20, 2011

Fat Quarterly Fabric Pack

Hi all! John here with this fortnight's installment of the Fat Quarterly Fabric Pack. I was SO EXCITED to work on this project, because mixing & matching fabrics is my absolute favorite part of the quilt-making process. For this fabric pack I teamed up with Cathy at Wish Upon a Quilt, whose large selection of great fabrics made it really difficult for me to decide on a 9-fabric bundle.

In fact, in my first pass I wound up with 25 fabrics in my bundle:

Fat Quarterly Fabric Pack

Greens & yellows comprise a fun, springtime garden-type mix, with touches of brown and red for some interest. But I knew a bundle of 25 fat quarters would be a tough thing for most quilters to commit to, so I began the process of winnowing it down ...

I first cut it down to 16:

Fat Quarterly Fabric Pack

Then 12:

Fat Quarterly Fabric Pack

And, finally, a more manageable bundle of 9 fat quarters:

Fat Quarterly Fabric Pack

This fabric assortment really got its hooks into my brain, and I just had to see it and play with it in person to make sure it "sung" before I recommended it to you all! So I drove over to Wish Upon a Quilt (it's my local shop!), picked up a bunch of fat quarters, and -- over the course of last Friday night and Saturday afternoon -- cut everything up into 8.5" squares and made a simple patchwork quilt.

And you know what? I LOVE it!!

Patchwork Quilt

Note: I did pick up cuts of all of the original 25 prints, plus a few extras and some prints I had in my stash.

Patchwork Quilt

So what do you think? Do you like my selection? If so, the fat quarter bundle is available here. Swing on over to Wish Upon a Quilt and tell Cathy I said "hi"!

Friday, February 18, 2011

Beetle Bugs by Saffron Craig

Saffron Craig has dropped by today to tell us a little about her latest range 'Beetle Bugs', this one is so cute, you're gonna love it we're sure!


My new range "Beetle Bugs" was designed with boys in mind. The inspiration came when my 5 year old daughter and her best friend were drawing snails and bugs they'd collected from my back yard and I saw their fascination with these little creatures.

The collection presents itself with 6 designs in a harmonious palette of leafy greens, earthy creams and greys accented by vibrant orange and deep reds. Fabrics are printed on 100% light-weight cotton.

Snails and Ladders: this is a large repeat design at 64 cm with lovely detail in red, orange, warm grey and green.

Bug Spot: Little bugs are caught on a spot and are blowing in the wind defying gravity. Light green spots with mid grey bugs on a warm cream background.

Bug Wings: The geometric and textural design of the range. The bug wings form a dense spot-like pattern in a light green with a tiny splash of a red dot on a light background.

Beetle Bug: the namesake on the range. Bold and vibrant bugs are caught inside bubbles and being tossed and turned in the breeze. We've already seen this fabric turn up as hats, dresses and bean bags.

Running Bugs: Saffron loves a running stitch, so she thought she might take a pun with this one! Little Beetle Bugs are crawling along the running stitches to create a stripe. The parallel lines decorate the fabric all over the cloth and the repeat is 64cm. The dashed lines are dark red on cream coloured fabric.

Bug party: a super dazzling fun fabric playing with the idea of bugs having a great time. Some are flying, while some are caught in a breeze holding onto a leaf as they fly. Other bug's are chasing each other playing games. Dark red with bright red and a lovely orangy yellow.


Thanks so much Saffron for introducing us to Beetle Bugs & sharing the inspiration behind this fun design.

Beetle Bugs is available to purchase online from Saffron's Web Store , so scurry along there :)

Wednesday, February 16, 2011

Cara's Charity Challenge

the basics charity challenge.

One of the most exciting trends we've seen recently in the online quilting community is the willingness of crafters to band together to help those in need.

Consider the many amazing activities already going on: Victoria's Bumble Beans Basics Quilt Gather, All People Quilts' Million Pillowcase Challenge, Rachel's do. Good Stitches charity bee, Heather's {Modern} Relief project, and Melissa & Beth's Handmade for the Holidays. It's been wonderful to see people across the globe, connected by their love of sewing, crafting, and quilting, share their passion and talents in a way to make the world a better place.

Now, Cara from Cara Quilts is challenging all of us to step up and help out in our local communities ... and have the chance to win fabulous prizes in the process. Cara's Basics Charity Challenge is simple in its premise: make a small donation of personal essentials -- like paper towels, toiletries, underwear, and socks -- to a local organization in need in your community. Let Cara know that you did it. Win great prizes. It's that easy.

Please read Cara's beautiful post about her inspiration for this challenge. It's also where she lists the details of how to play along as well as all of the prizes donated by her generous sponsors.

(And while you're at it, check out all of the other links we've mentioned above too. You're sure to find an activity that inspires you to get involved in your own special way.)

Big thanks to Cara and her big heart for giving us another opportunity to help others in need. Won't you accept the challenge?

Monday, February 14, 2011

Updates from FQHQ

Happy Monday, and Happy Valentine's Day to all of our readers!

And because today's all about love, we here at FQHQ want to express our love for two members of our team who have recently made the difficult decision to leave Fat Quarterly. Though we're sad to see both Kate and Nova go, we are so excited to see where their journeys will take them next. No doubt it will involve fabulous quilts, flawless stitching, and comfy knitting.

So BIG THANKS today go out to our valentines Kate and Nova for their skill, hard work, talent, good humor, creativity, vision, and unbelievable work ethic. You helped to make Fat Quarterly what it is today, and it certainly won't be the same without you. Miss you already!

xoxo
Tacha, Katy, Brioni and John

P.S. Speaking of Ms. Nova, don't forget that her Single Girl Support Group (quilt-along), co-hosted by Katy and Megan (of Lucy & Norman) is kicking off today! The fun starts on Katy's blog. Check it out!

Saturday, February 12, 2011

Modern Day Quilts

Today on Fat Quarterly we are excited to introduce you to the person behind the fantastic blog Modern Day Quilts. Grab a hot drink, sit back, kick up your feet and enjoy. And when you've done reading head over to the Modern Day Quilts blog, feast on the eye candy and add it to your daily reads - it's inspirational.

My name is Heather Grant and I have been sewing since I was 10. I made my first quilt when I was 21. As I approached my mid-20s, I stopped quilting for awhile because much of what I saw at the time didn't fit my taste. I had started to collect mid-century modern furniture and quilt style in the mid-to-late 90s just didn't fit in with the decor. Then I read on profile of Denyse Schmidt in Martha Stewart Living in 1998. I loved what she was doing, but it wasn't until I ran across a copy of Quilt Artistry by Yoshiko Jinzenji when it was first published in the US around 2002-2003 that I got back into quilting again. These two artists fit my aesthetic. I made my first modern quilt, based on a Denyse Schmidt couture design in 2006. Professionally, I have always almost always worked with artists, designers and other creatives in a variety of industries (newspaper, film, publishing, semiconductors), so being the champion for other people's creative work is something I love to do. My blog isn't all about me, it is about you, the artists, I'm just the curator.

L1000743
(Kaleidoscope Quilt by Rebecca Loren)

FQ - Why did you start Modern Day Quilts?
Selfishly, I started it for myself. Modern quilting has exploded on the internet. There are so many blogs and flickr photos that call itself modern quilting. In my opinion, not all of it is modern. I wanted to read a blog that just featured the best examples of modern quilting. I wanted to read a blog was capturing the evolution of modern quilting. I wanted to read a blog that featured the person who only made 1 or 2 awesome quilts a year alongside the people who made their living off modern quilting. I needed a blog to cut through the clutter and help tighten up the definition of modern quilting. I couldn't find a blog like that, so I started it myself. I figure there has got to be others like me who were feeling overwhelmed by the volume of it all.

FQ - How you choose the quilts to feature
I choose quilts seem like prime examples of modern quilting. If I wouldn't want in my house, it is not going on the site. I guess you could say I'm a modernist digital version of Joyce Gross.

80s BatWing Sweater
(80s Batwing Sweater,Katy Jones)

FQ - What do you want to achieve with Modern Day Quilts? (for example do you want to expand the minds of old fashioned quilters, bring unknown artists to the forefront, educate, rule the world...)
Modern quilting is evolving rapidly. I've been on the Fresh Modern Quilts flickr group since it was only a few dozen members. I want to capture the historical trends of modern quilting distilled, because that will be our definition as a community. It is fun to watch what becomes popular and trendy through the images. These trends don't always start with the big bloggers, I've seen someone do something really cool and then a bigger quilt blogger will tweak it, make a tutorial or popularize and it will take off. Ashley (Film in the Fridge) and her string quilts is a great example of this. She took that traditional block and owned it. Her string quilts also brought color into the forefront and made white the secondary color. Before that white was more heavily featured on quilts. On a color tangent, white used to be the major color element in modern quilts, but then grey has become huge. I'm going to go out on a limb and forecast to say that I think navy blue will be the next hot neutral/background in modern quilting.

Alliance, Nebraska
(Alliance by Alexia Abegg)

I'm not sure if "expand the minds of old fashion quilters" is the right term. Traditional quilters are light years ahead of modern quilters in many techniques. From a technical perspective, they do some really interesting stuff that modern quilters haven't touched. It just happens to be in layouts, color palettes and designs that are not appealing to modern quilters. Piping is a great example. It is very popular with traditionalists right now, but you don't see much of it in modern quilting. It is something that I really think, if used correctly, could be really amazing in modern quilting. An example of a technique developed by traditionalists but used by modernists is the 6-minute circle by Dale Fleming. I would qualify Dale Fleming as a traditionalist with art quilter influences. Her technique jumped the traditional/modern line and the modern quilt community has done some really amazing things with it. I think modern quilters have much to learn from traditionalists and vice versa. Sometimes we can be blinded only by the images in front of us and don't always look at the techniques behind it and how we can use that to our benefit. Personally, I think we are missing a big part of knowledge from the traditionalists.

I love featuring folks who only post their photos on flickr and don't have a blog. I feel like there is so much great talent out there, but not everyone has the time to blog. Quilts are a pretty large undertaking, quilting enough to keep up with a blog isn't always an option for everyone.

FQ - What does the future holds - how long do you think you can show a quilt a day? Are there that many quilts out there?
Sometimes I forget that modern quilting has not been online that long. I think the Fresh Modern Quilts group was started in late 2007, early 2008. That is not that long ago. Right now, it hasn't been to hard finding quilts. They majority of the quilts I've featured were made in the last few months. If needed, I will raid our brief past, but I'm trying to avoid that because I'd like to show what is happening in modern quilting today. Yet, I do think the past is important, I'm currently emailing a few quilt museums to see if I can feature photos from their collections. Some very modern looking quilts happen to be 100 years old. Poking around International Quilt Study Center & Museum's website is quite a bit of fun.

I've also got some ideas for monthly podcasts, which I'm mulling over in my head, but for right now, the blog is in a great place.

front
(Yield by Heather Jones)

FQ - Anything else you'd like to share?
I want to thank all the talented quilters out there, I am so happy quilting has progressed to such a fantastic viewpoint. I also want to thank R0ssie for birthing modern quilting. Denyse Schmidt and Yoshiko Jinzenji may have been the first artists, but by creating the flickr group in the beginning, she corralled all the online modern quilters into a community and she really defined modern quilting. Major props to her.

Major props to Heather too, we think. And a huge thank you for taking the time out to chat with us at FQ.

Thursday, February 10, 2011

Be Our Guest: Peppermint Pinwheels

Over the coming weeks we will be hearing from crafters in our 'Be Our Guest' series. We hope you find their stories and crafts as inspiring as we do!

If you are interested in appearing on the Fat Quarterly site or in an issue of Fat Quarterly, drop us a note at submissions@fatquarterly.com

First up is Stacey who creates some of the most striking quilts around. Stacey's quilts have a traditional focus but the finished product is far from traditional. You can read all about Stacey's quilting adventures at her blog, 'On The Design Wall'

Fearless Quilting
by Stacey Sharman

I am afraid of many things - cockroaches, things that might be living under my bed, a world without bubbly beverages - but somehow, I have never been afraid of quilting.  I would never even know such a thing existed, except that I hear and read about it often when people talk about quilting.  They’re afraid of choosing fabrics, taking on a new technique or pattern, the level of commitment it takes, and most of all, I think they’re afraid of putting vast amounts of love and time into making something that will be judged and found lacking.

To those people, the quilters that are afraid, I say, “Wouldn’t it be wonderful to be a fearless quilter?”  I think, quilters often like to have rules to follow, so I’ve come up with a few do’s and don’ts to help you become a quilter who’s not afraid to break the rules.

The DO’s

1. You can’t go wrong with colors and fabrics you love.  Value really is one of the most important aspects of having an interesting quilt, so pair the fabrics you adore with fabrics of a different value (light, medium, dark) and don’t be afraid to throw in a touch of something wild.

2. Steam and starch are your friends.  If my piecing must be exact, I douse my fabric in spray starch.  This makes the fabric hold its shape better which helps me to cut more exact shapes and sew them together with better accuracy.  And, if I’m doing improvisational piecing, there’s nothing like a good steam to make my fabrics obey and lay flat.

3. Finish what you start in a timely manner.  If you don’t like it much now, you’ll really hate it in a year and you’ll never finish it.  And it’s quite possible that while you’ve outgrown your project, someone else you know would love to have it.  As the sign says in one of my favorite quilt shops, “A finished quilt is better than a perfect one.”

4. Be brave!  If you hate it, don’t be afraid to do something about it.  Cut it up, twist it around, sew it back together.  Is it better yet?  No?  Cut it in half and piece something through the middle of it.  Still hate it?  Put it in the scrap bag and use it in a different project.

5. If matching points matters to you, baste your seams and check your points before actually sewing the seam.  That way, if you got it wrong, it’s a lot easier to rip apart those big stitches and redo it.  If they don’t match after a couple of tries, perhaps it’s not meant to be!

6. Do it again. Practice really does make perfect.  And let’s face it, we’re dealing with fabric here and we know where to get more of it!

7.Do ask for advice and critique, but, if the sensitive artist in you is fragile, only ask trusted sources.  Also, don’t ask “does my butt look fat in this?” kinds of questions.  Don’t point out the things that bother you.  Wait and see if they even notice, because chances are, they won’t!

The DON’Ts
1. Don’t think about it too hard.  I find that my first choice is often the best choice.  If you look at something for too long, you begin to lose perspective.  If you really are having a hard time making up your mind, it’s time to walk away and do something else for the afternoon.

2. Don’t be afraid to go “off the grid.”  Sometimes it’s fun to cut without rulers.  Improvisational quilting is an excellent way to play with color and pattern, and rulers are not required.
3.Don’t be intimidated by anyone or anything!  You can do it!  Maybe it wouldn’t be the way someone else would do it or with the colors or fabrics someone else would use, but that is what makes your quilt special.  It’s all you!

I also just want to throw in a few tips that I wish someone had told me when I first started sewing. 

 *To begin sewing a seam, sew over a little scrap of fabric and then up onto the seam you want to sew together (without cutting the thread in between).  This will keep the edge of your fabric from getting eaten by your sewing machine or creating a bird’s nest made of thread on the back of your fabric.  Some quilter’s call this little scrap of fabric a “piggy,” while other’s call it a “chicken.”

*It really is worth it to buy the best sewing machine you can possibly afford.  I went through at least 6 or 7 sewing machines before getting my Bernina 130 (the love of my life!).  My enjoyment in the process of sewing went from a 3 to a 10 the day my new machine came home with me and it’s been wonderful ever since.

* No one sews in a perfectly straight line.  Just do your best, try to keep you seam allowances the same width.  It also helps to iron the seams flat, before you press them open or to the side.


 Bio: Stacey Sharman has been quilting fearlessly since the mid-1990’s when she made her first hand-pieced pinwheel block in a college textiles class.  She opened her quilt company, Peppermint Pinwheels in September, 2009 and has used that as an excuse to sew obsessively ever since.  You can find out more about her and her quilts in the following places:

Website: www.peppermintpinwheels.com

Blog: www.onthedesignwall.blogspot.com

Flickr: www.flickr.com/peppermintpinwheels

Tuesday, February 8, 2011

Glorious Green

It was so tricky to pick this selection, so much green goodness going on over at the flickr group.
1. green wreath, 2. actinidia deliciosa, 3. Circle/bubble cushion, 4. chartreuse and scraps top, 5. another view, 6. Greenfield Hill block 1, 7. accessory bag v1 - finished, 8. HR ticker tape quilt WIP, 9. Green stuff

The next colour theme is 'Amazing Orange' and will be showcased here on February 22nd.

Monday, February 7, 2011

Swiss Chocolate Winners

Big thanks to Amanda Murphy and the folks at Robert Kaufman for the free quilt pattern and the chance to win some Swiss Chocolate fabric. We're pleased to announce the three winners of the giveaway:


Rebecca said...84

I hope I am not too late to enter. This fabric looks so delicious!

Jessica said...35

Love Swiss Chocolate! Thanks for the chance to win :)

~Kathleen said...15

Amanda is an extremely talented designer. I love her fabric designs! Thank you for tell us more about her. ~Kathleen

Congratulations Rebecca, Jessica, and Kathleen! Please send your mailing information to winstuff@fatquarterly.com and we'll get your prize out to you ASAP.

Have a great week, everyone!

Sunday, February 6, 2011

Fat Quarterly Fabric Pack

This fortnight's fabric pack has been put together by Katy. I am sure you will be just as taken with this pack as we are - gorgeous!


This pack can be purchased at Pink Chalk Fabrics

Saturday, February 5, 2011

Clever Quilter Mystery Winner!

Jean from the Clever Quilter & us all here at FQ loved reading your 'quilting mystery' comments from Jeans feature post! While some were serious mysteries, others had us all giggling - you guys are great :)

& so to the winner of the Thimbleberries fat quarter pack kindly donated by Jean.....

Number 2! Congratulations Mommarock!

Please drop us a line to winstuff@fatquarterly.com with your details